Waystation Echo DevLog 6: Animations and Items
When you first start out it seems like a lot of what you are doing is never going to pay off. Countless times I have sat in exhaustion wondering when I will see some progress on what I am doing; everything goes by so slowly when you are a solo indie developer, that when times of great progress do come, you have to remind yourself to stop and celebrate your accomplishments.
Today is one of those moments of great progress. Not only have I created the rest of the arm animations to support the pickup and idle poses for the Rsync tool, I've also got a custom depth render pass working correctly to highlight items in the scene that I want to interact with (it's not just for items I want to pick up).
In the gif demo below, as long as you can ignore the weird green flashes that come up (which has to do with my screen capture tool and not the game itself), you can see a rough idea of where I am now:

I've been working on an animation state manager that will be used to check if the player has every picked up an item of that type before. If the answer is yes, then the player will just pickup the item like you see in the gif. If, however, the player has not picked up the item before, then a custom item pickup animation will play. This is just a neat little sugar to sprinkle on a pretty rudimentary--but ultimately effective--animation strategy for each item being held and/or used.
I've also started tackling the keypad.
Keypads! #
So I really like how Doom always had red keys to open red doors, blue keys to open blue doors, etc etc. What I don't like is that this is such an overdone way of doing things. In Waystation Echo there are doors that are locked and associated with a color-coded keypad, but instead of needing a certain card to open the door, I am switching this up a little bit and requiring that your player knows the key code for those specific colors.
It's nothing more than design sugar over an existing concept, but I think little things like this help our ideas become the signal in what is the noise of today's saturated indie game market. (No more soapboxing, I promise). So instead of finding a key, you'll find a colored code (that you don't have to know; it's just a representation of a code) and then you can go up to the same color keypad and hit the Use button. This will make your player type in some dummy digits and then the door will open.
The sugar part of this is that you can do this to any keypad, even if you don't know that keypad color's code yet. For these ones, it will run through the button-pressing animation BUT the door won't open. It's an amalgamation of quick actions, audible feedback, and visual experience.
Here's how the keypad idea started:

It's fairly simple, as you can see. From here, I needed a way to cheat my way into making it seem like the player was actually interacting with the keypad. As long as I placed the keypad in areas where there is ample room in front of it (you know, like a normal keypad in real life), I should be able to get away with some kind of rapid animation sequence involving control of the player's camera.
Here's my idea:
- When the player indicates that they want to interact with the keypad, we take control of the player and move them to an interact spot.
- From there, we play the interact animation.
- When the animation is finished, we move the player back to the spot they were at before moving them to the interact spot, then return control.
_And all this has to happen in the span of about a 1-2 seconds. _Again, I want these things to be quick audiovisual experiences.
Later, I worked out the idea:
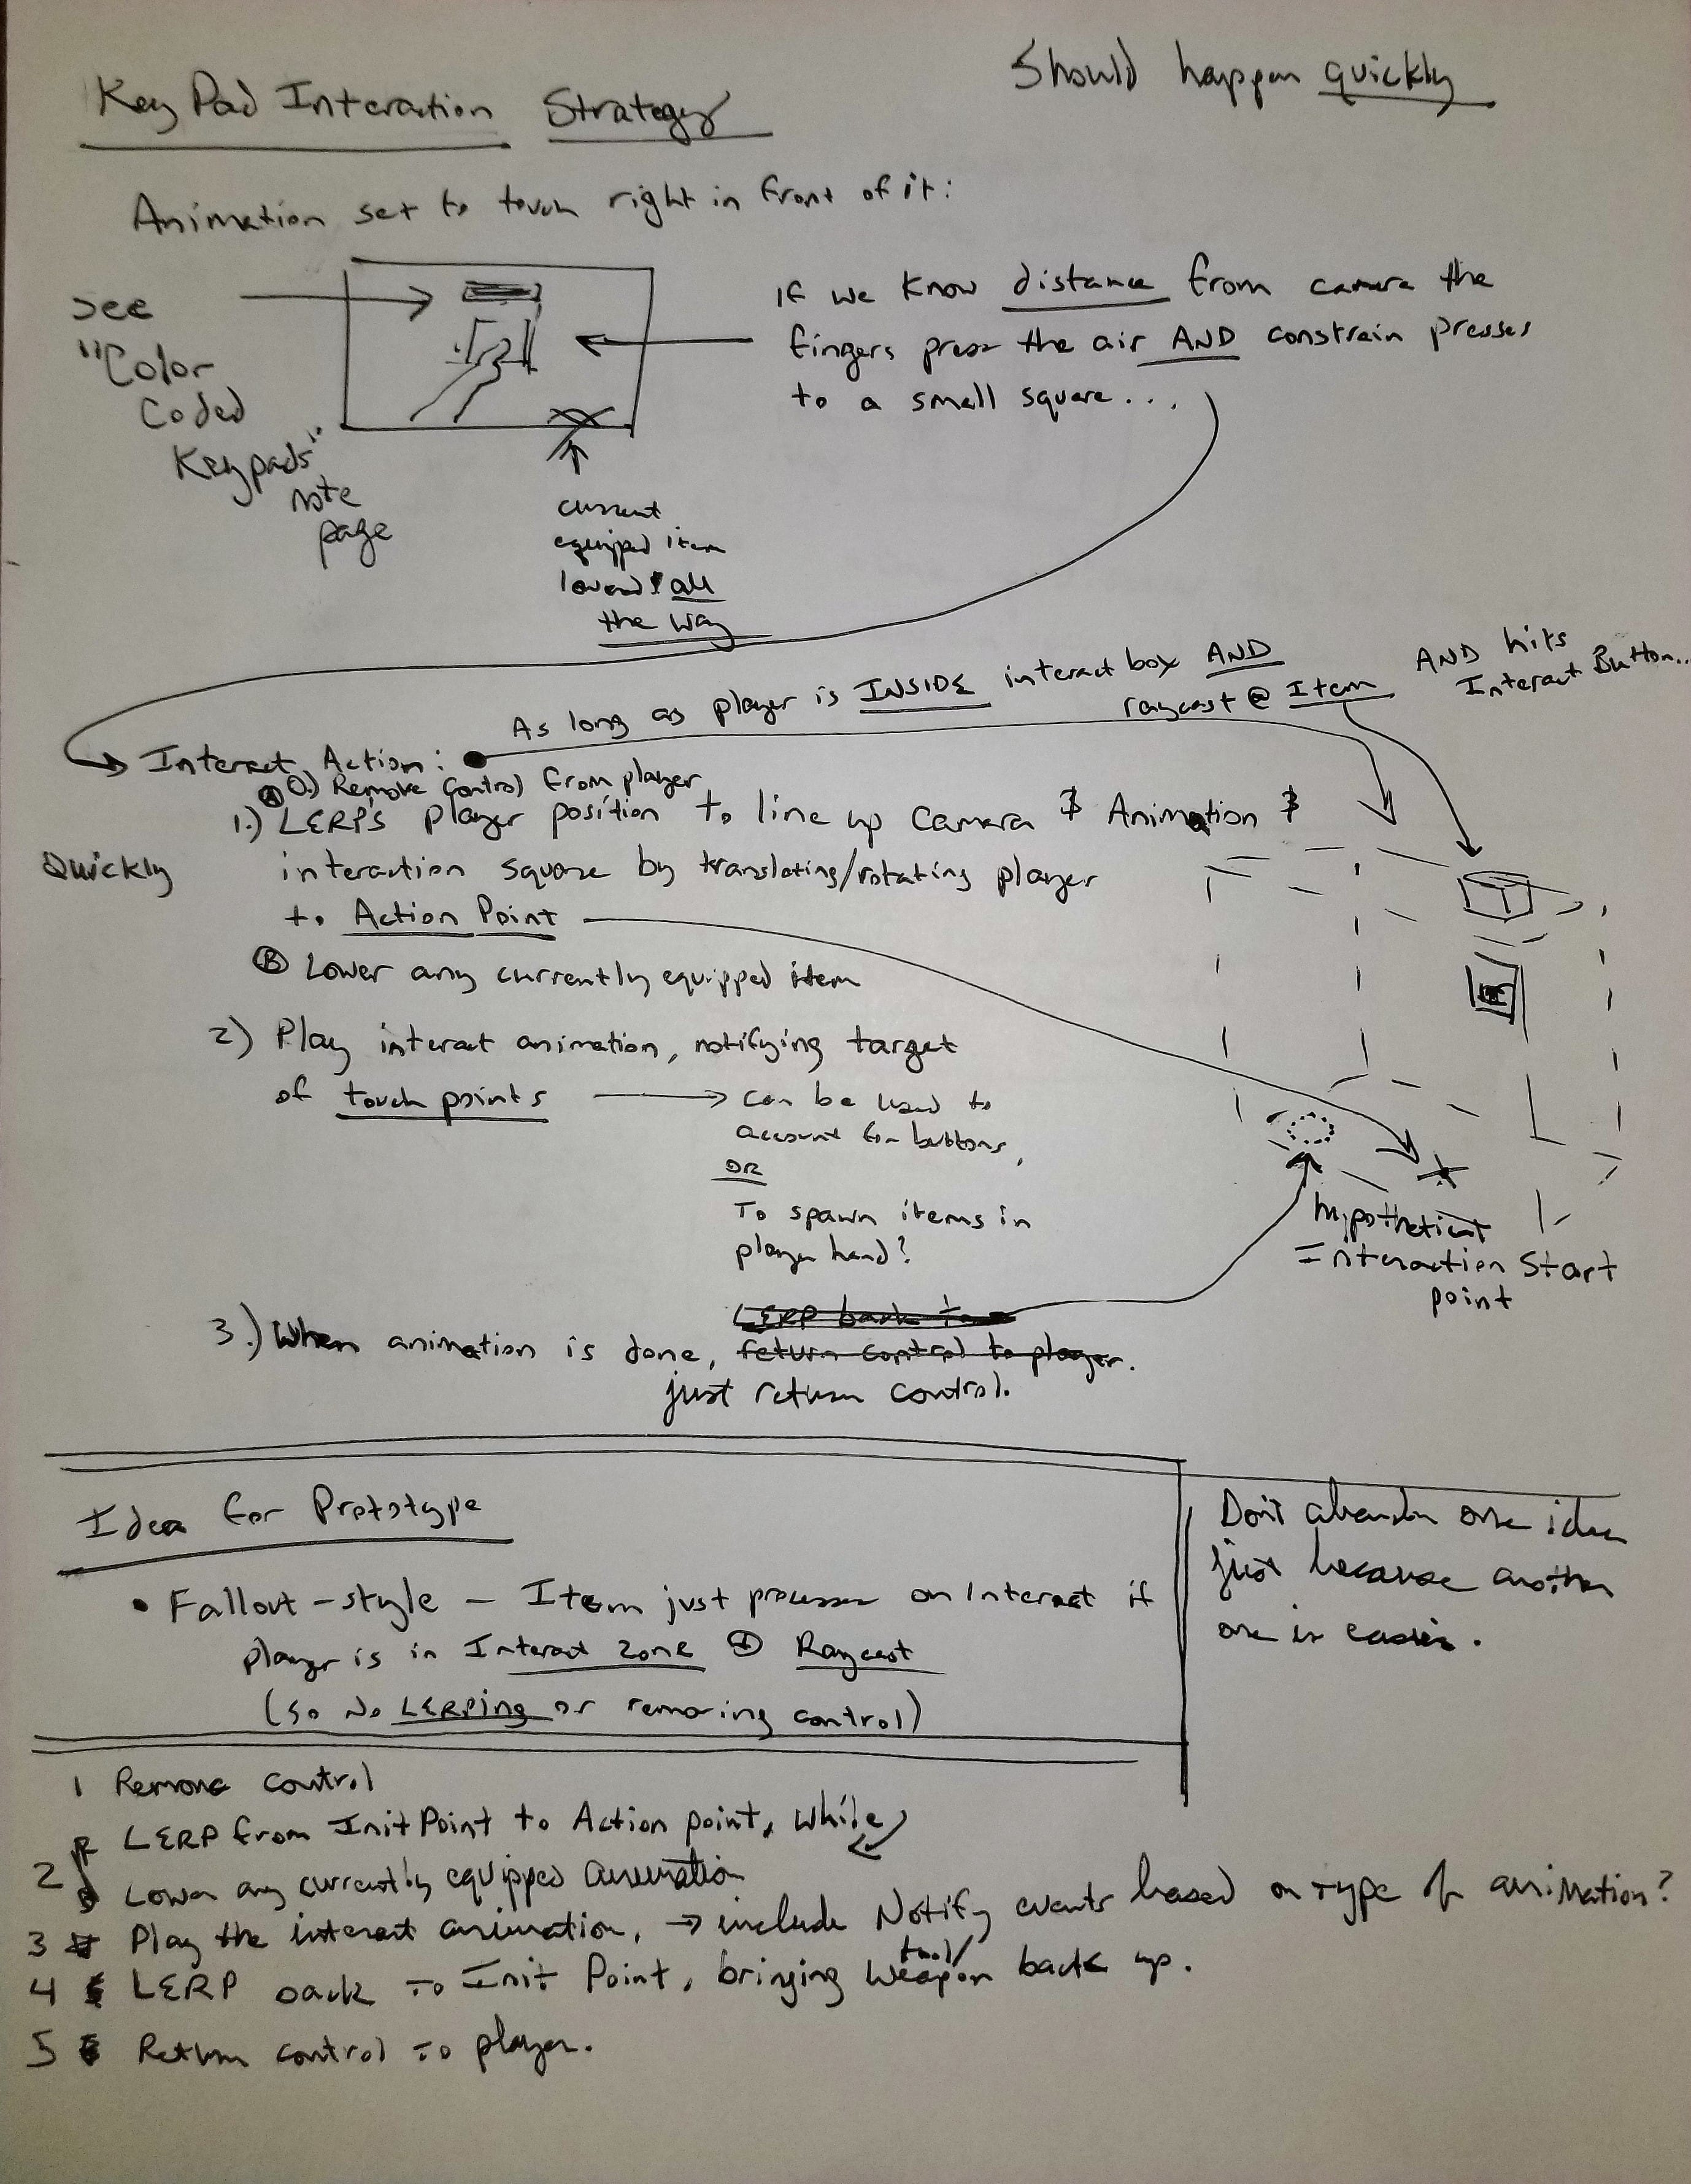
Probably the most important takeaway from this is not how I did what I wanted to do, or even the idea of what I was trying to accomplish. Instead, take a look at the note I gave myself next to that section at the bottom named Idea for Prototype. You can see that I wrote down an easier method of doing this instead of my complicated way of doing it, and used the word Prototype to give myself permission to create a sub-par system. Move your eyes now to the right of that box, and you'll see the following note to myself:
Don't abandon one idea just because another one is easier.
This is probably the most important takeaway I can give you: just because one idea is crazy complicated, as long as you have a measurable outcome and the technical confidence to get it done, do it. Make your work stand apart. Don't ever settle for good enough when you can push yourself to great enough.
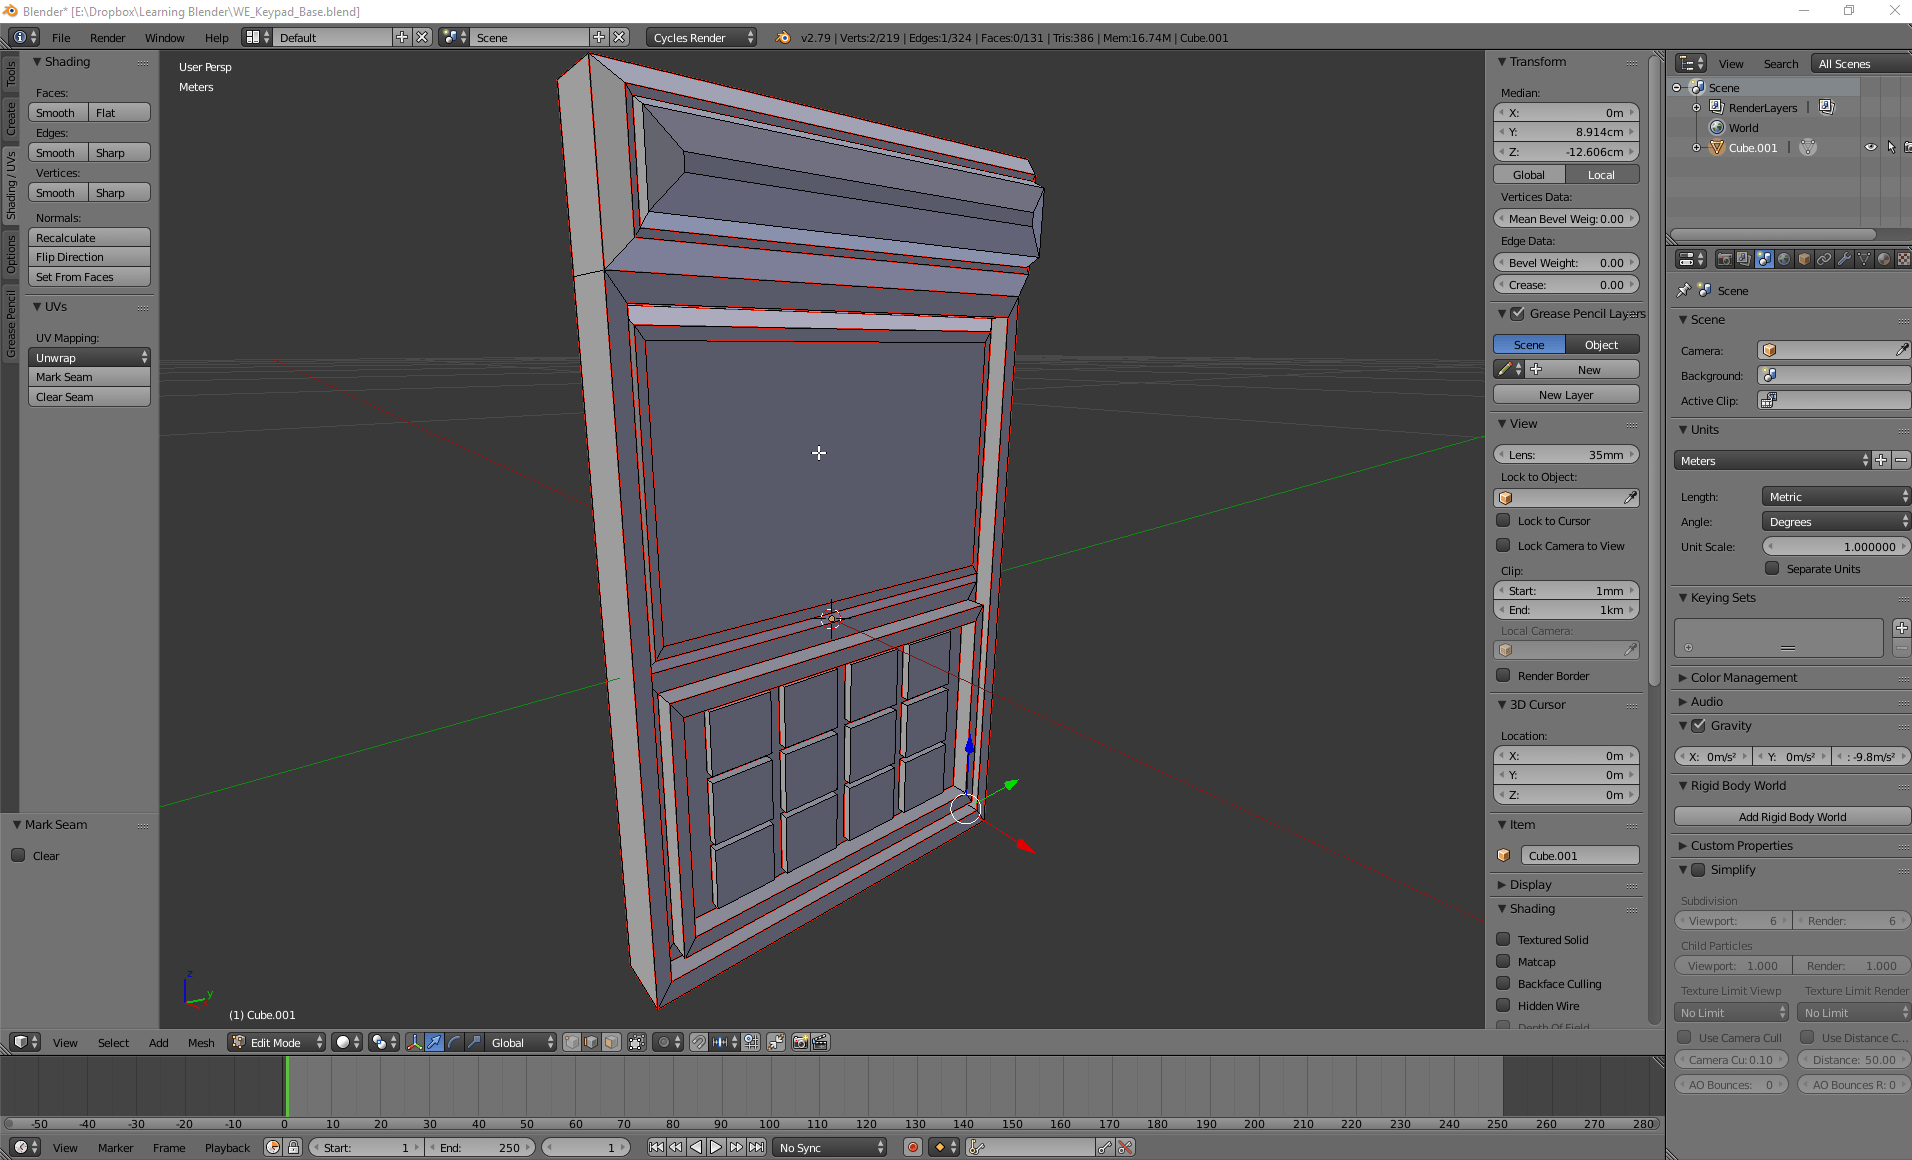
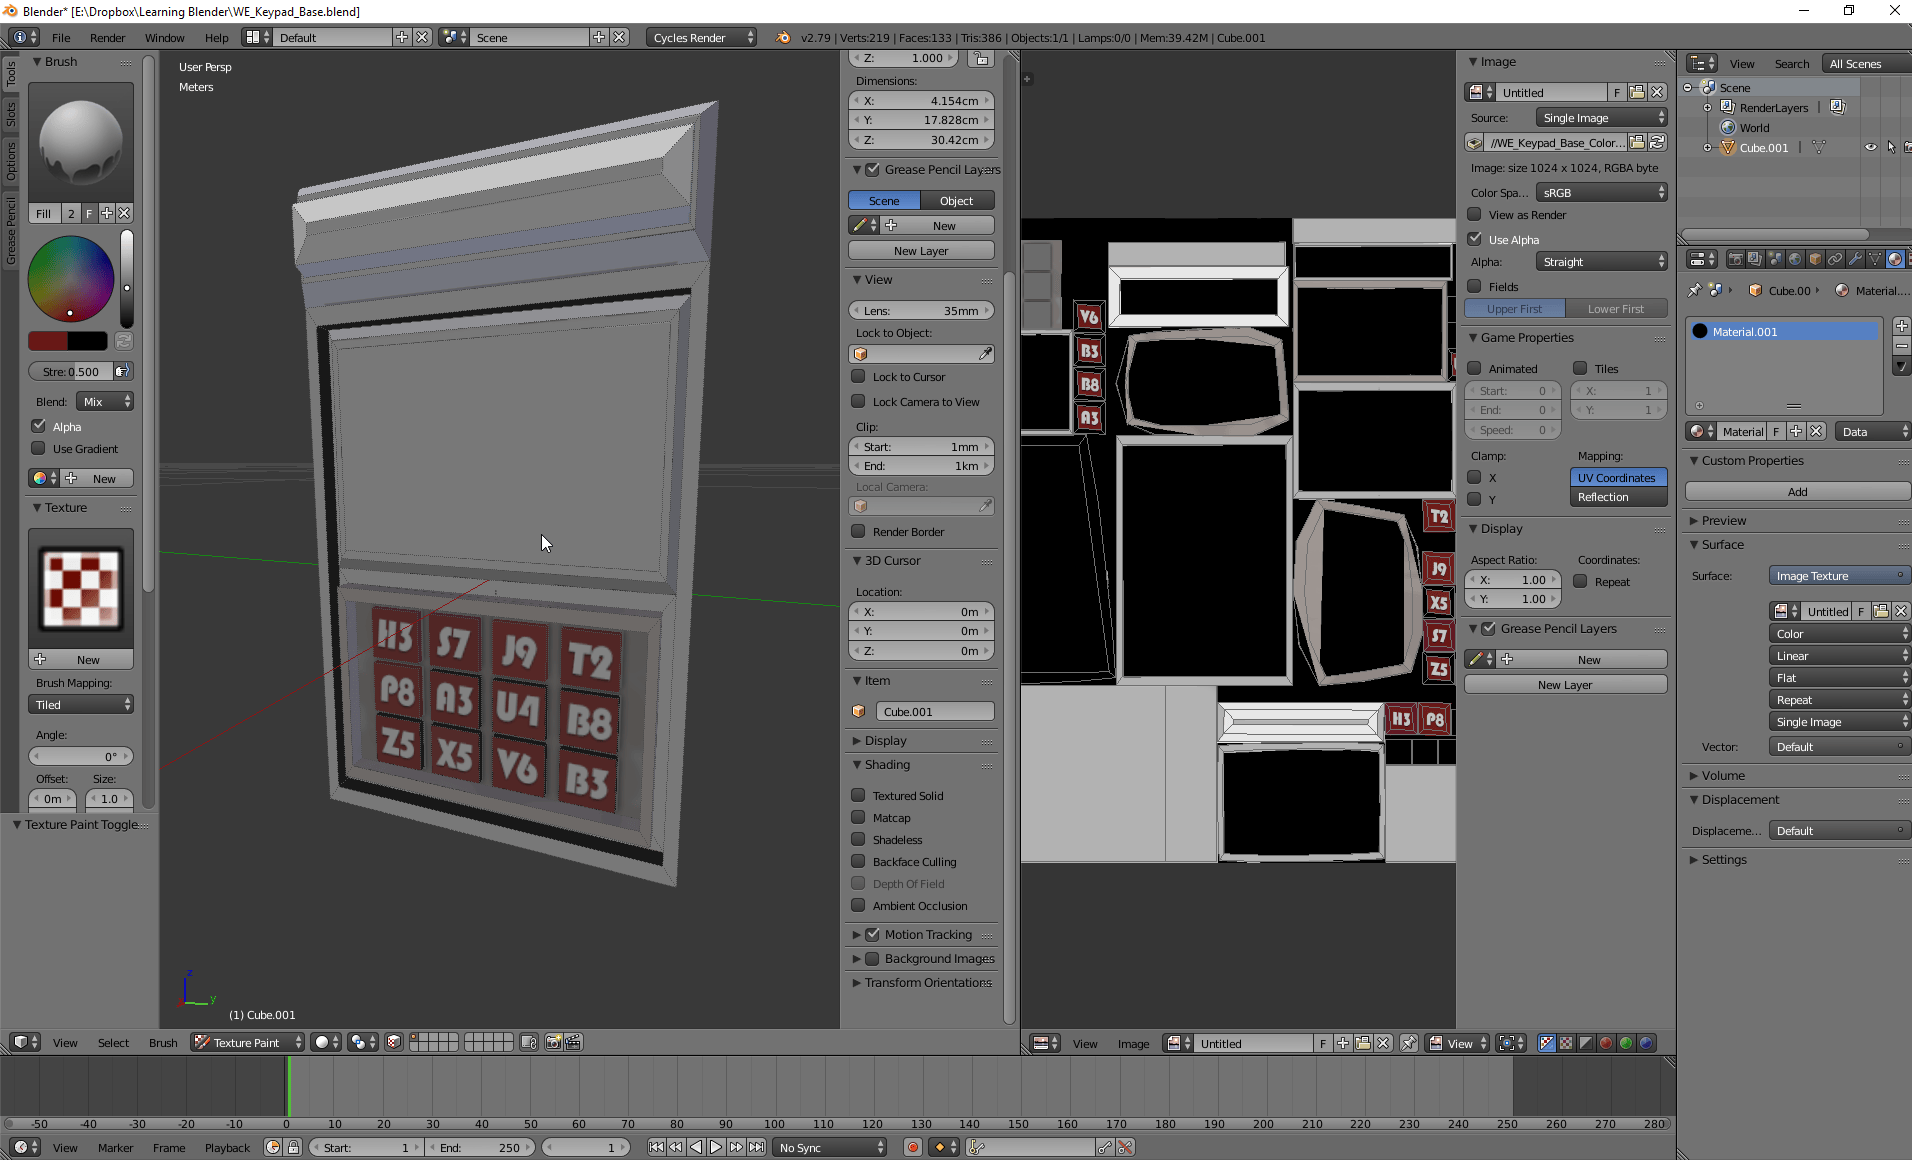
So with the idea hashed out, I went over to Blender and whipped up a keypad. I spent about 30 minutes putting some color and stuff on it, which is my version of "programmer art." I love working in Blender but I much prefer animation over creating things from scratch.
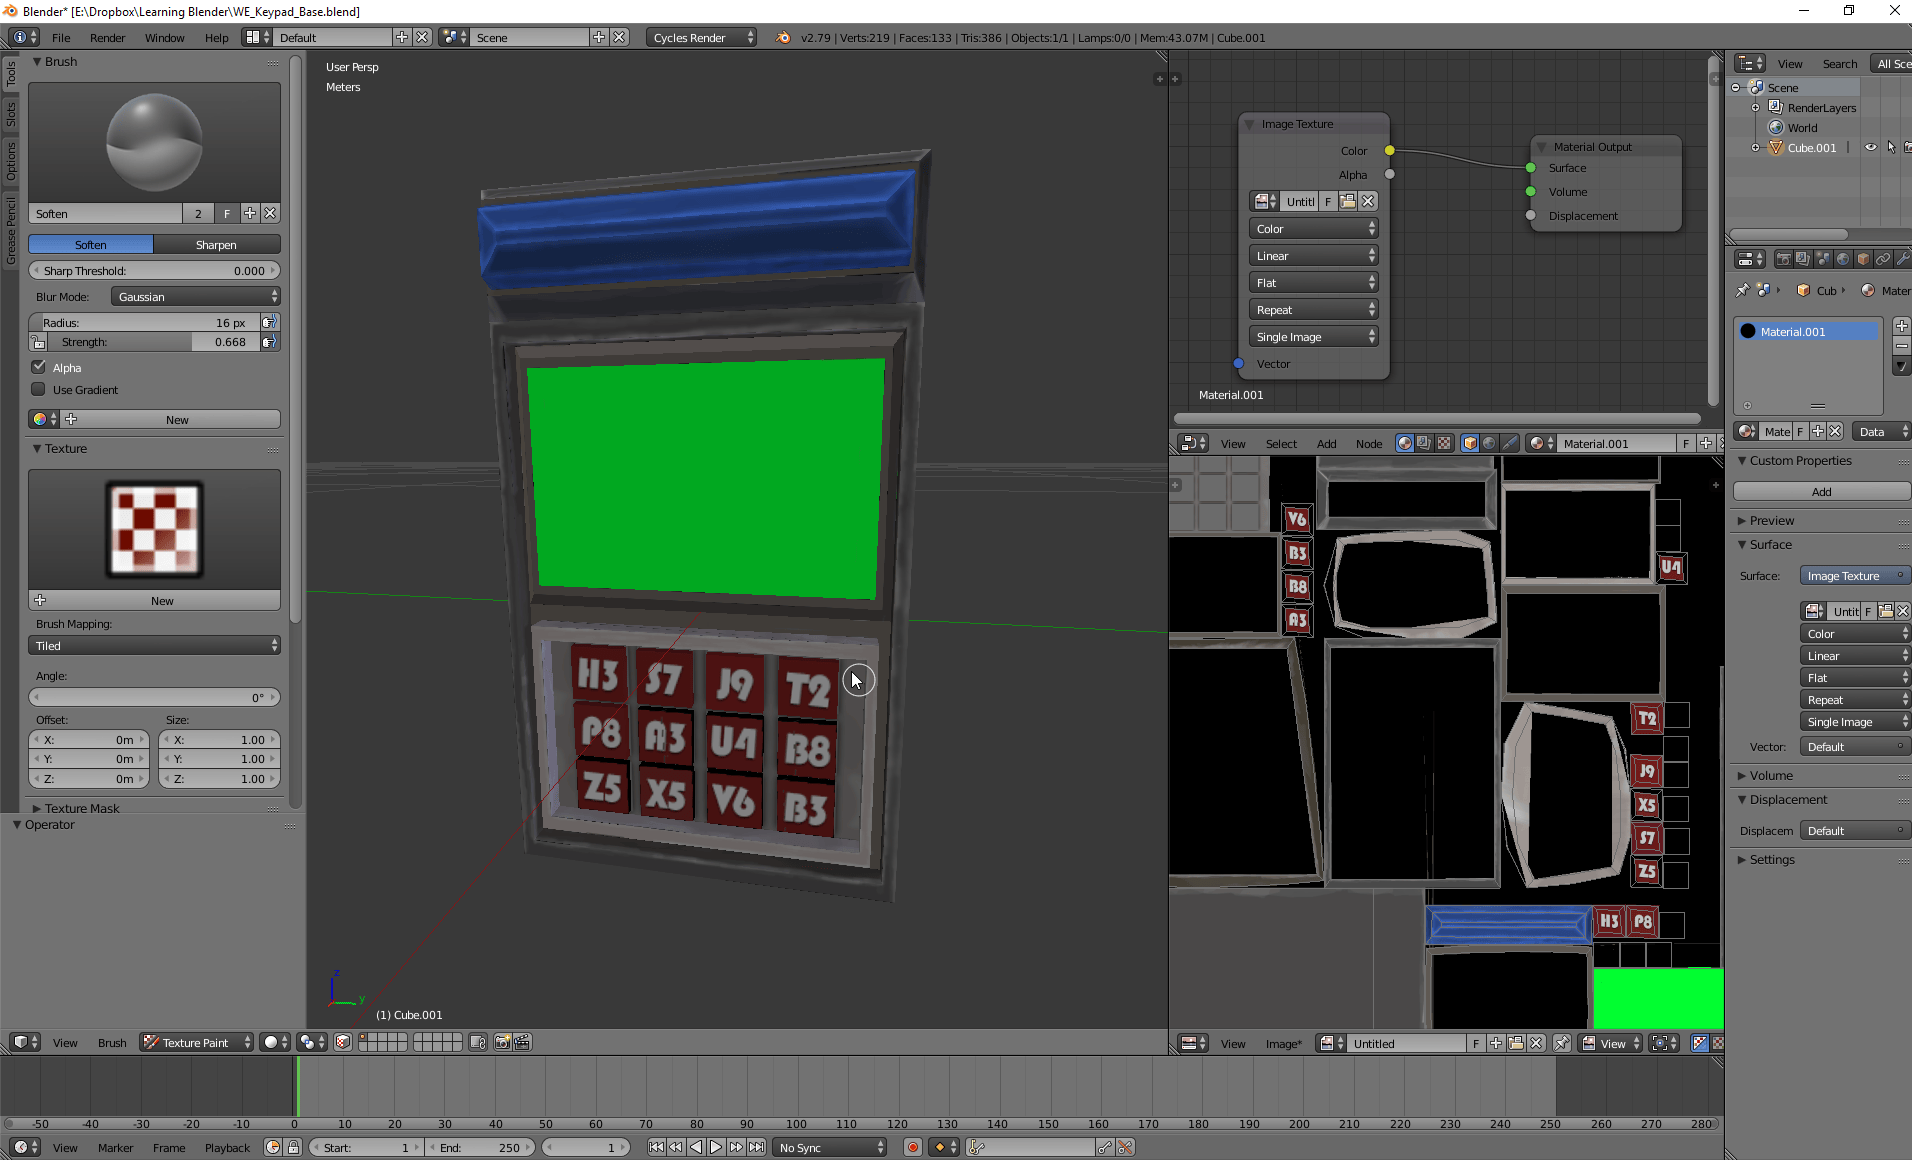
My favorite way to show off this stuff is not in Blender but in Unreal Engine. Here's a quick example of the Blue Keypad in game:

The next steps from here include, in no particular order:
-
Modifying the BlueKeypad class to handle interactions appropriately.
-
Creating a blueprint class with the Blue Keypad C++ class as parent.
-
Creating customized screen materials based on the keypad state--and possibly the door state?
-
Here's an idea I just thought of: Expose the state of the keypad so that a nearby door can read it and listen for state changes, like "OnUseSuccess()" and "OnUseFail()"... hmm!
Though I should be working on the keypad well into Saturday and Sunday, I think a lot of my time will be spent trying to solve some weird issue with blueprints I am running into.
Update: See the section "Blueprint details don't match in-game details" to see what I was dealing with and how I fixed it.
Item Polymorphism #
A quick note on the polymorphic relationship of the items. I spoke with a couple people in a Discord chat about the process I am using to design, develop, and organize the items in the game, and I wanted to share that with you here in case you were also trying to figure out a good way to do all this.
As an example, let's look at two items: the **rsync **and the blue keypad.
Everything starts as an AActor. From there, I have a basic pseudo-interface class called **AUsableActor **(inspired by Tom Looman), which serves at its own parent for two broad categories of things in the game: interactables, and items.
An item is a UsableActor that can be picked up and added to the player's inventory. It may or may not be equipped.
An interactable is a UsableActor that cannot be picked up, but can be used. It may or may not require a Power Core to work.
Here's a polymorphic breakdown for those interested:
- AUsableActor : AActor
- AWaystationEchoItem : AUsableActor
- ARsync : AWaystationEchoItem
- AWaystationEchoInteractable : AUsableActor
- ABlueKeypad : AWaystationEchoInteractable
Doing it this way ensures that any character functionality that would interact with either an item or interactable can work for any type of usable object, and ensures that trying to use a pickupable object would pick it up to be used, rather than just playing whatever use animation is necessary to use it.
There is one huge caveat to this, though: The Item class cannot be used as a direct representative of each individual item. This is because it derives from AActor, which means I would have to setup a whole system for managing which item-actors are attached to the player, instead of just creating a separate version of those inside the character files themselves.
To solve this problem, I'm making the Item classes correspond to items that are in the game that I can pick up, and then having the Character class account for different, usable versions of those classes. This centralizes all item customization into the Character class, which is good and bad. Good because it's all in one spot, bad because oh-my-god I have files that are very long. It's reminding me a lot of how I solved problems in Gravity Grid. At the end of the day, I am reminded of what I sometimes tell other game developers:
The more you abstract under the sun, the more you detract from your game being done.
Just get it done! No one cares how you got it done, only _that _you got it done. I'd rather see a finished game written entirely in a single .cpp file than an unfinished game that is beautifully organized and full of examples of polymorphic perfectionism.
Item spawning on pickup, or, How I learned to stop worrying and love the dumb way #
I had planned out this whole idea of inventory item spawning that I had to scrap yesterday because of some weird hot reload bug (which I talk about later). Instead of that, I ended up using the Item class to refer to objects in the game that I can pick up, and then have their Item Type switch a flag on a static inventory that spawns when the Player is constructed to switch on/off an associated item that the player can use.
In other words, when an Item is interacted with in game, it will be picked up, and then the Player's version of the Item (created manually in the constructor and attached in BeginPlay()) is set to active.
There are a couple things I learned along the way:
- Your components should only be set to VisibleAnywhere or VisibleDefaultsOnly, which gives you a property that points to its component (i.e., the pointer cannot change, but the component properties can)
- If you set a component to EditAnywhere, you are telling your BP that you want this component to point to something else.
- If you are creating a UObject type (and NOT a component), then you can go ahead and use EditAnywhere or EditDefaultsOnly.
The other thing I learned (the hard way) is that there are some components that you will need to attach to other components during BeginPlay(), which will not show you what is going on accurately in the editor. This is because the editor shows you the result of running the object's constructor, but BeginPlay() won't be called until the game is started.
This causes your items to look like they are floating everywhere BUT where they're supposed to be. Nevertheless, this is the way to go and will not crash your process.
As an example, in BeginPlay() I am using this:
RsyncMesh->AttachToComponent(
  Mesh1P,
  FAttachmentTransformRules::SnapToTargetNotIncludingScale,
  TEXT("socket_lefthand")
);
where Mesh1P is the character mesh (the first person arms), and the socket_lefthand is a custom socket I created for the left hand where the Rsync tool attaches to.
Blueprint Details don't match in-game details #
This was a weird one. I kept running into this weird problem where my Blueprint details in the Blueprint editor would be an old version of what the blueprint was. Here's what I mean:
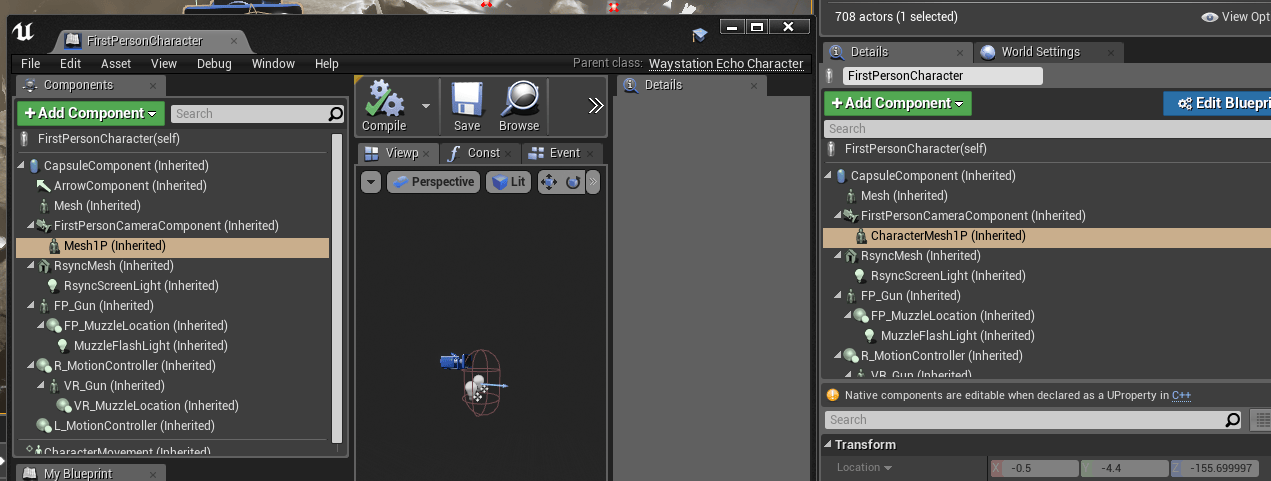
On the left you can see the FirstPersonCharacter blueprint in the BP editor. On the right, there's the Details panel of the FirstPersonCharacter instance in question. Note the inconsistencies in component names; the one in game was the only one using the actual variable data from Visual Studio. On top of that, it kept saying that I couldn't modify my components--that they weren't declared with a UPROPERTY macro.
The only thing I could come up with in searches was a problem about hot reload files being wrongly attributed to the current state of the game. I tried deleting the hot reload files so that Unreal Engine would rebuild them, but I kept running into the issue you see in the above screenshot.
After spending a day trying to wrap my head around this, I eventually just** reinstanced my BP class from the parent C++ class again**, renaming it to something other than the one that is broken, and then used the new BP instead.
It all just worked. So I can only assume that this is some weird hot-reload bug or something. These crashes and weird blueprint oddities when using C++ are probably the most frustrating part about using Unreal Engine.
When this happened again later, I did some more digging and found others running into this issue when they would build the solution from Visual Studio with an unsaved Blueprint. In other words, if you do this:
- Make changes to a blueprint, but
- Never hit the "Compile" button, then
- Build the project from Visual Studio,
then you will have a bad day. What I ended up doing when this problem happened for the second time was 1) close the UE editor, 2) delete EVERYTHING from the /Binaries directory, then 3) reopen the UE editor. When you open your project, it will prompt you to rebuild your files. Select "Yes," and then voila: everything is back where it should be.
The road ahead #
Going forward I am excited to keep working on the arm animations and to build out the Rsync tool and its functionality. There will be a lot of work to be done on items that can be Rsync'd, specifically things that can hold a charge and not hold a charge. I am also experimenting with some puzzle mechanics/ideas that I might integrate sooner than later. We'll have to see!
Hopefully by next week I have a working Rsync tool, some items that can hold a charge, some better inventory system method functions in the character class, and (crossing my fingers) a working HUD tooltip system like I had in Unity.
JL